Bing Maps: Adding and tracking pushpins using JavaScript
I played with Bing Maps AJAX-based API and found it to be very easy to use after you know basic objects and you are able to use them. In this posting I will show you simple example about how to add pushpins to map and how to show coordinates of pushpins to users.
Our Bing Maps solution
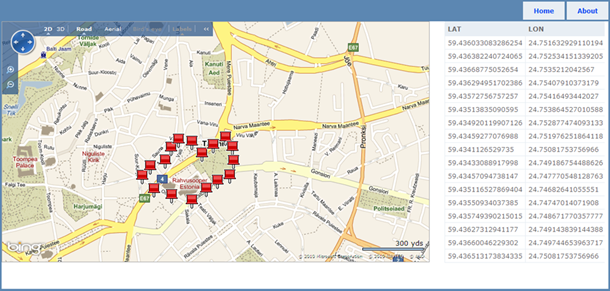
Before we dig ourselves to pretty simple code let’s see the end result so we are motivated to read on. On this map I tracked down one of my walking paths when I want some good coffee and clear my mind. Click on image to see it at original size.
To add pushpin to map I just have to double-click on point where I want to add new pushpin. New row will be added to table on right automatically.
Mark-up
Here is the HTML for my simple map solution.
<div id="myMap" class="mapLayer"></div>
<div id="routeLayer">
<table id="routeTable">
<tr>
<th>LAT</th>
<th>LON</th>
</tr>
</table>
</div>
<div style="clear:both;"> </div>
That’s all about additional mark-up. Of course, I modified styles of default MVC application a little bit but it was nothing that is worth showing here. When my app is ready to use I will publish it to my Visual Studio experiments page at GitHub. You can hear more about my solution from my new blog that I will announce during next couple of months. Meanwhile let it be secret, okay? :)
Including API and loading map
The following JavaScript block shows how to include Bing Maps AJAX API to page and how to load map. One more thing – the div where map is shown is 800 pixels wide and 600 pixel high. It is set in style sheet.
<script type="text/javascript"
    src="http://ecn.dev.virtualearth.net/mapcontrol/mapcontrol.ashx?v=6.2">
</script>
<script type="text/javascript">
    var map = null;

    function GetMap() {
        map = new VEMap('myMap');
        map.AttachEvent("ondoubleclick", AddPushpin);
        map.LoadMap(new VELatLong(59.43655681809183, 24.75275516510011),
                    15, VEMapStyle.Road, false);
    }

    onload = GetMap;
</script>
NB! To get map loaded right now comment in second line of GetMap() method!
The first script reference loads Bing Maps API. GetMap() function initializes map with coordinates and zoom level. In the end of script block windows onload event is made to fire GetMap() method. This is how we get map work and this is how we show there what user should see when map is loaded.
Adding pushpins to map
In the GetMap() method we registered double-click event for our map. Double-click event is handled by AddPushpin() method that adds new pushpin to map.
<script type="text/javascript">
    function AddPushpin(e) {
        var pixel = new VEPixel(e.mapX, e.mapY);
        var point = map.PixelToLatLong(pixel);

        var pin = new VEShape(VEShapeType.Pushpin, point);
        pin.SetTitle("Double Click");
        pin.SetDescription("DoubleClick Event");
        map.AddShape(pin);

        AddPointToRoute(point);

        return true;
    }
</script>
To get pushpin to correct location and to find out coordinates we are using Bing Maps API objects. point is point on map in map coordinates. pin is pushpin objects that is added to map. The last method that is called – AddPointToRoute() – adds the coordinates of new pushpin to table.
Adding pushpin coordinates to table
To add pushpin coordinates to table I call AddPointToRoute() method in double-click handler. In this method I ask table from DOM, create new row and add columns to it with latitude and longitude values. The code is here.
<script type="text/javascript">
    function AddPointToRoute(point) {
        var tr = document.createElement("tr");
        var td = document.createElement("td");
        td.innerText = point.Latitude;
        tr.appendChild(td);

        td = document.createElement("td");
        td.innerText = point.Longitude;
        tr.appendChild(td);

        var table = document.getElementById('routeTable');
        table.appendChild(tr);
    }
</script>
One note to holy warriors of all these JavaScript selectors – I know jQuery and I know very well how to use it. In current case I see no need to include another load of JavaScript to my page if I only win in couple of code rows.
Conclusion
This posting shows us how easy it is to use Bing Maps and client-side API to handle and control maps. To get map work like expected we only needed some rows of HTML and some short JavaScript methods. All the complexity is hidden from us behind Bing Maps API. All we need to use is simple interface that is very well documented and illustrated.


Nice article.
I appreciate what you’re saying about not using jQuery but I think you should have used it because anyone taking away code from this article is likely to be using this in a larger context where the jQuery inclusion would be worth it.
Thanks for feedback, rtpHarry! If somebody really wants to use my lines of code in some bigger context then there are only couple of lines to change. Not a big problem, I think. :)
I have done this thing, but i am getting the error like whenever i tried to Zoom in or Zoom out, my Pushpin is relocating. i mean my pushpin point is not the same where i plotted. Any idea for that issue?
Hi Deb! I have face no problem like you described. What browser and which version you are using? Do you experience the same problems with other browsers too?
Hello Gunnar Peipman,
Thanks for great example with explanation.