Beer IoT: Reporting measurements to Azure IoT Hub
As we have now fully functioning thermal solution running on Windows 10 IoT Core it’s time to focus to other components of our beer freezing solution. Our solution measures and calculates metrics of cooling beer but it doesn’t report this data anywhere. In this blog post we will set up Azure IoT Hub for our solution so it starts reporting measurements to Microsoft Azure.
- Beer IoT: Measuring temperature with Windows 10 IoT Core and Raspberry Pi
- Beer IoT: Moving to ITemperatureClient interface
- Beer IoT: Measuring cooling rate
- Beer IoT: Making cooling rate calculation testable
- Beer IoT: Estimating beer cooling time
- Beer IoT: Reporting measurements to Azure IoT Hub
- Beer IoT: Using Stream Analytics to save data from IoT Hub to SQL database
- Beer IoT: Visualizing sensors data using Power BI
- Beer IoT: Building Universal Windows Application to monitor cooling process
Update. Source code of my TemperatureStation solution is available at Github. The solution contains IoT background service and web application you can use right away. Readings are reported to MSSQL or Azure IoT Hub. Documentation is available at TemperatureStation wiki. Feel free to try out the solution.
Why Azure IoT Hub?
We are using Azure IoT Hub because it supports device-to-cloud and cloud-to-device messaging scenarios. In our case:
- device-to-cloud: our beer cooling solution will report all measurements and status feedback to Azure IoT Hub.
- cloud-to-device: we use Azure IoT Hub to control beer cooling solution so it doesn’t have any need for additional services to control it.
Azure Event Hub supports only device-to-cloud scenarios and it has some additional limits coming form Azure Service Bus on what it is built on. To find out more about differences between Azure IoT Hub and Event Hubs go to the page Comparison of IoT Hub and Event Hubs.
NB! From this point on I expect you have created empty Azure IoT Hub on Microsoft Azure and it is ready for use. LINK!!!
Registering device
When we add new device we have to register it in our IoT Hub. We have to do it in code. Based on the registration device gets access token that is used to communicate with IoT Hub.
NB! You have to create new Console Application to register your device. The library you are using for this doesn’t support Universal Windows Applications. It works only with full .NET Framework.
Take the code from Azure IoT Hub documentation page Get started with Azure IoT Hub for .NET. Here’s my simple code that worked from first shot as soon as connection string was correct.
namespace ConsoleApplication1
{
    class Program
    {
        static RegistryManager registryManager;
        static string connectionString = "Connection to IoT Hub";

        static void Main(string[] args)
        {
            var deviceId = "MyDevice";
            registryManager = RegistryManager.CreateFromConnectionString(connectionString);
            var deviceTask = registryManager.AddDeviceAsync(new Device(deviceId));
            deviceTask.Wait();
            Console.WriteLine("Key: {0}", deviceTask.Result.Authentication.SymmetricKey.PrimaryKey);
        }
    }
}
You can find connection string from your Azure IoT Hub settings page under Shared access policies –> iothubowner.
Update current time on RaspberryPI
Before we can report measurements we have to make sure that we don’t run into time related issues with SAS token we are using to access IoT Hub. On Windows 10 IoT Core for some reason clock is hour or two behind. We have to set it to current time using PowerShell.
Log in to your RaspberryPI using PowerShell like shown on page Using PowerShell to connect and configure a device running Windows 10 IoT Core. Now go through the following steps:
- Check the current time using Get-Date command.
- If time is correct then close PowerShell.
- If time is not correct then check how many hours it is behind current time.
- Run Set.Date (Get-Date).AddHours(number of hours) to set clock to current time.
- Close PowerShell.
For some reason my RaspberryPI is not able to get connected to time servers and therefore I had to set correct current time manually through PowerShell.
Reporting measurements
Now let’s connect background service to Azure IoT Hub.
NB! We are using code from my previous BeerIoT posting Estimating beer cooling time. You can find Startup class from posting Measuring temperature with Windows 10 IoT Core and Raspberry Pi. Through previous postings we have add new stuff to original code, so make sure you go also through the previous posts.
To keep things simple we add some new fields to Startup class.
private const string iotHubUri = "<host>.azure-devices.net";
private const string deviceKey = "key we got above";
As host URI instert your Azure IoT Hub URL. You can find it in essential information block on hub main page. As a device key use the key we got from console application above.
To communicate with Azure IoT Hub we need Nuget package. Add package Microsoft.Azure.Devices.Client to your background service project.
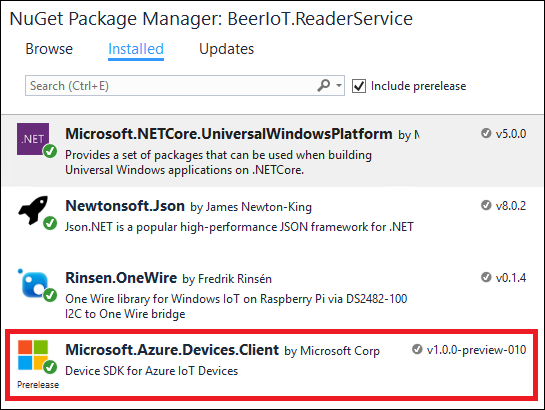
When service starts we have to connect to Azure IoT Hub. It’s better to keep one client instance alive than creating one every time we have to report measurements. We add new class level member to Startup class:
private DeviceClient _deviceClient;
When Run method is called we instantiate this field.
public void Run(IBackgroundTaskInstance taskInstance)
{
    taskInstance.Canceled += TaskInstance_Canceled;

    _deviceClient = DeviceClient.Create(iotHubUri,
                                        new DeviceAuthenticationWithRegistrySymmetricKey("MyDevice", deviceKey),
                                        TransportType.Http1);

    _tempClient = new TemperatureClient();
    _timer = new Timer(TemperatureCallback, null, 0, 5000);

    while(!_isClosing)
    {
        Task.Delay(2000).Wait();
    }
}
NB! It’s important to use Http1 as transport type because Advanced Message Queuing Protocol (AMQP) is not supported in Universal Windows Application projects yet..
Now let’s write method to report measurements to Azure IoT Hub.
private void ReportMeasurement(DateTime time, double beerTemp,
                               double ambientTemp, double estimate){
    var beerMeasurement = new
    {
        deviceId = "MyDevice",
        timeStamp = time,
        beerTemp = beerTemp,
        ambientTemp = ambientTemp,
        estimate = estimate
    };

    var messageString = JsonConvert.SerializeObject(beerMeasurement);
    var message = new Message(Encoding.ASCII.GetBytes(messageString));

    _deviceClient.SendEventAsync(message).AsTask().Wait();
}
When timer elapses and callback is called we must call this method to report measurements to Azure IoT Hub.
private void TemperatureCallback(object state)
{
    var now = DateTime.Now;
    var temps = _tempClient.Read();

    if (!_kMeasurementDone)
        MeasureCoolingRate(temps);

    var beer = temps.First(m => m.DeviceId == BeerSensorId);
    var ambient = temps.First(m => m.DeviceId == AmbientSensorId);
    var estimate = -1d;

    if (_kMeasurementDone)
        estimate = Calc.GetCoolingEstimate(beer.Value, _ta, 1, _k);

    ReportMeasurement(now, beer.Value, ambient.Value, estimate);

    foreach (var temp in temps)
    {
        Debug.WriteLine(now + " " + temp.DeviceId + ": " + temp.Value);
    }

    Debug.WriteLine("Estimate: " + TimeSpan.FromMinutes(estimate));
}
If there’s nothing wrong with device ID or Azure IoT Hub host name then all measurements will be reported to hub and we should see picture like this on our hub main page.
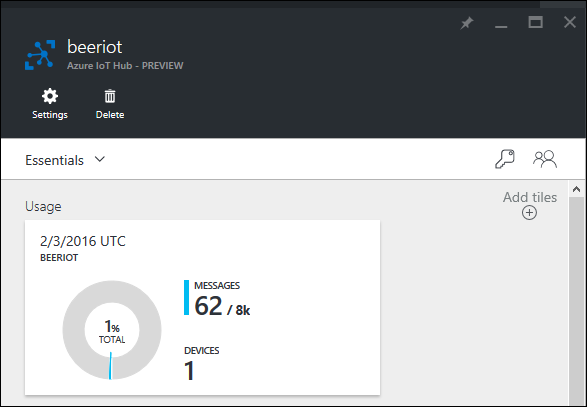
The number of messages doesn’t change immediately when new measurements are reported. Just wait some minutes and you see changes in numbers.
Wrapping up
Now we have our beer IoT solution connected to Azure IoT Hub and all measurements are reported there. Although registering device was a little bit kinky activity we did it by creating console application. Also we configured our RaspberryPI the way it doesn’t deprecate SAS tokens. But we still don’t see the data and we don’t have any idea what’s going on. Next posts in this series will focus on displaying and visualizing data we gather from IoT devices.




Pingback:09-01-2016 - a shit load of links... - Magnus Udbjørg