Previous post in series focused on setting up Jekyll build pipeline. After successful build we have new version of blog waiting for publishing in build artifacts folder. This post shows how to publish Jekyll static blog to Azure static website using Azure DevOps release pipeline.
Live demo and source are available! Live demo of Jekyll static blog is here: https://jekyll.gunnarpeipman.com. Source code with sample content is available at my Github repository gpeipman/JekyllBlog.
Before building release pipeline we have to take a moment and think about what to do with deleted files.
How to handle deleted files?
One question we have to answer sooner or later is about deleted files as we don’t have any good solution to track deletes. There are two options we can consider:
- Manual delete. If we need to remove some file from our site then we delete file from our blogging folder on our work machine using Windows Explorer. From live site we delete file using Microsoft Azure Storage Explorer.
- Always publish from clean state. We can remove all files from live site before uploading new ones in release pipeline. This way we have always last clean state of site in live.
I prefer manual delete. When site is stable then deletes are rare but they still happen. It’s not hard to delete few deprecated files. Deleting all files from live before publishing may push you to troubles. Just wonder if there are visitors on your site and then suddenly CDN cache expires but new files are still on the way.
Things can be even worse – files are successfully deleted from live but publishing step of release pipeline fails. Now you have nothing to show to users until problems are solved. Think about it.
Setting up Jekyll release pipeline
We don’t get away so easily with release pipeline. With build pipeline everything went fast – just click-click-click and run. Release pipeline needs more configuring but it’s easy and we can do it through browser
- Release pipeline needs files of our site like they should go to live. These files are called artifacts. Click on Add link.
- Publishing live version of site to artifacts folder was done by Jekyll build pipeline. Configure input artifact like shown on screenshot below.
- Release pipeline contains at least one stage. Every stage contains tasks. For us one stage is enough as release process is not complex one. Now add new stage to release process.
- Dialog opens and from there select empty stage. Give some meaningful name to stage and submit.
- Click on agent jobs and tasks link in stages box and add new “Command line” task. Under agent job it appears as “Command line script” and add the following lines to Script field (remove files we don’t need in public space):
del *.yml
del *.gemspec
Set working directory to publish artifacts directory (in our case it’s site)
- Add “Azure CLI” task to release pipeline. Select subscription and set “Inline script” as script location. Paste the following command to inline script field (use Azure CLI to upload files from site folder to Azure static website):
az storage blob upload-batch --source site --destination $web --account-name jekyll --output table --no-progress
- Save release pipeline and run it.
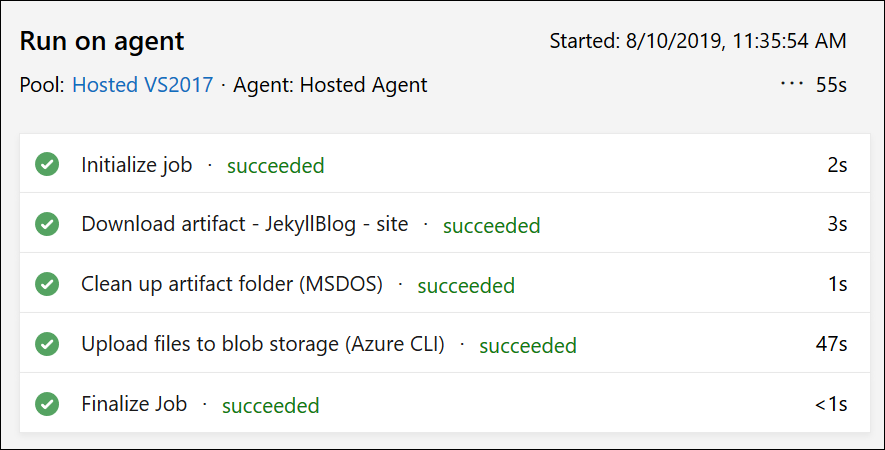
If release pipeline completed all steps successfully then our site is available on Azure storage static website.
Type in URL of Azure static website (you can find it from Azure storage account settings) and see if site looks like expected.
Warning! Luxury makes us convenient and lazy. Azure DevOps can send e-mail notifications about succeeded and failed builds and releases. Good starting point is blog post end Email After Release Deployment in Azure DevOps by Edi Wang.
Wrapping up
Now we have automated the whole publishing process of our Jekyll blog. We can start writing blog posts and push them to Git. Everything else from this point happens automatically. There’s one more step left – setting up custom domain for blog using Azure CDN and Azure Key Vault services.
View Comments (3)
Hello,
Getting the following error when the release pipeline is run:
Deployment failed:
Agent job - Failed / Azure CLI failed
1 error: Script failed with error: Error: D:\a\_temp\azureclitaskscript1567198342032.bat failed with return code: 2
I ensured that I did your instructions exactly.
Mark
It seems like az command is failing. If you open failed task in release log you will get more information about what went wrong. As I don't know what's the output in your case I can only wonder what it probably was. Make sure you selected correct Azure subscription and all parameters of az storage command are correct. When I set release pipeline up then I made few mistakes in this place.
Probably related to the --account-name jekyll
If the user used a different storage name, CLI will fail. Would ensure that the command is adjusted to the right storage name.
Thanks for the series of posts, was very useful!