ASP.NET Core: Building chat room using WebSocket
WebSocket is real-time communication protocol we can use to make UI in browser to send and receive messages from server over real-time communication channel. WebSocket is also supported by ASP.NET Core. This blog post demonstrates how to build simple browser based chat room on ASP.NET Core and WebSocket.
Our chat room has two views: one for inserting nick name and the other one for chat room. We will use two controller actions and one middleware class to get the fully functional chat room. Of course, we will use WebSocket package too. The web site Can I use reports that majority of modern browsers support WebSocket protocol.
NB! You can browse source code or download Visual Studio 2017 solution from AspNetCoreChatRoom Git repository.
Creating “Login form”
We use here simple form where user can insert his or her preferred nick name for chat. To keep us focused on WebSocket stuff we don’t add any logic or checks in this point. Let’s add view called InsertUserName.cshtml under Home folder.
<form action="@Url.Action("Index")" method="post">
    <input type="text" placeholder="Insert user name" name="userName" />
    <input type="submit" value="Eńter" />
</form>
There will be another view for chat room and we will come back to it later when web sockets related code is done. Index() methods of home controller look like this.
[HttpGet]
public IActionResult Index()
{
    return View("InsertUserName");
}

[HttpPost]
public IActionResult Index(string username)
{
    return View("Index", username);
}
If request method is GET then we show nick name form and if request method is POST we will show chat room view.
WebSockets middleware
Now let’s write ASP.Core middleware for WebSocket. To keep things simple I mixed together custom WebSocket middleware and custom WebSocket connection manager from Radu Matei’s post Creating a WebSockets middleware for ASP .NET Core. I like the work Radu has done but here we will keep things as small as possible. To get better understanding of WebSockets I suggest you to go through Radu’s post.
NB! To use WebSockets in ASP.NET Core project add reference to Microsoft.AspNetCore.WebSockets NuGet package!
In breaf, this is what our WebSocket middleware class does:
- Keep concurrent dictionary with connected WebSockets (this is needed for message broadcast)
- Read messages from WebSocket and broadcast there to all known WebSockets
- Try to keep WebSockets dictionary as clean as possible
Here is the WebSocket middleware class.
public class ChatWebSocketMiddleware
{
    private static ConcurrentDictionary<string, WebSocket> _sockets = new ConcurrentDictionary<string, WebSocket>();

    private readonly RequestDelegate _next;

    public ChatWebSocketMiddleware(RequestDelegate next)
    {
        _next = next;
    }

    public async Task Invoke(HttpContext context)
    {
        if (!context.WebSockets.IsWebSocketRequest)
        {
            await _next.Invoke(context);
            return;
        }

        CancellationToken ct = context.RequestAborted;
        WebSocket currentSocket = await context.WebSockets.AcceptWebSocketAsync();
        var socketId = Guid.NewGuid().ToString();

        _sockets.TryAdd(socketId, currentSocket);

        while (true)
        {
            if (ct.IsCancellationRequested)
            {
                break;
            }

            var response = await ReceiveStringAsync(currentSocket, ct);
            if(string.IsNullOrEmpty(response))
            {
                if(currentSocket.State != WebSocketState.Open)
                {
                    break;
                }

                continue;
            }

            foreach (var socket in _sockets)
            {
                if(socket.Value.State != WebSocketState.Open)
                {
                    continue;
                }

                await SendStringAsync(socket.Value, response, ct);
            }
        }

        WebSocket dummy;
        _sockets.TryRemove(socketId, out dummy);

        await currentSocket.CloseAsync(WebSocketCloseStatus.NormalClosure, "Closing", ct);
        currentSocket.Dispose();
    }

    private static Task SendStringAsync(WebSocket socket, string data, CancellationToken ct = default(CancellationToken))
    {
        var buffer = Encoding.UTF8.GetBytes(data);
        var segment = new ArraySegment<byte>(buffer);
        return socket.SendAsync(segment, WebSocketMessageType.Text, true, ct);
    }

    private static async Task<string> ReceiveStringAsync(WebSocket socket, CancellationToken ct = default(CancellationToken))
    {
        var buffer = new ArraySegment<byte>(new byte[8192]);
        using (var ms = new MemoryStream())
        {
            WebSocketReceiveResult result;
            do
            {
                ct.ThrowIfCancellationRequested();

                result = await socket.ReceiveAsync(buffer, ct);
                ms.Write(buffer.Array, buffer.Offset, result.Count);
            }
            while (!result.EndOfMessage);

            ms.Seek(0, SeekOrigin.Begin);
            if (result.MessageType != WebSocketMessageType.Text)
            {
                return null;
            }

            // Encoding UTF8: https://tools.ietf.org/html/rfc6455#section-5.6
            using (var reader = new StreamReader(ms, Encoding.UTF8))
            {
                return await reader.ReadToEndAsync();
            }
        }
    }
}
Before using middleware we have to introduce it to request pipeline in Startup class of web application. We do it in configure method before initializing MVC.
app.UseWebSockets();
app.UseMiddleware<ChatWebSocketMiddleware>();

app.UseMvc(routes =>
{
    routes.MapRoute(
        name: "default",
        template: "{controller=Home}/{action=Index}/{id?}");
});
NB! It’s very important to add WebSockets before MVC. WebSockets middleware checks in the beginning if request is for WebSocket. If it is WebSocket request then middleware starts handling it. If MVC is added to pipeline before then MVC will handle all the requests and our WebSocket middleware is never used.
Chat room view
Now let’s add chat room view. We will use Index view of home controller for chat room. Chat room view initializes WebSocket connection and starts listening to it. If user writes something to chat box and presses Enter then message is sent to server over WebSocket and WebSocket middleware will broadcast it to all WebSocket clients it knows.
@model string
@{
    ViewData["Title"] = "Home Page";
}
<style>
    body {margin:0px; padding:0px;}
    .msg {
        position: absolute;
        top: 0;
        bottom: 30px;
        border: 1px solid green;
        margin-bottom: auto;
        display:block;
        overflow: scroll;
        width:100%;
        white-space:nowrap;
    }
</style>
<div class="msg">
    <div style="position:absolute; bottom:0;" id="msgs"></div>
</div>

<div style="position:absolute;height:20px;bottom:10px;left:0; display:block;width:100%">
    <input type="text" style="max-width:unset;width:100%;max-width:100%" id="MessageField" placeholder="type message and press enter" />
</div>

@section Scripts {
    <script>
    $(function () {
        var userName = '@Model';

        var protocol = location.protocol === "https:" ? "wss:" : "ws:";
        var wsUri = protocol + "//" + window.location.host;
        var socket = new WebSocket(wsUri);
        socket.onopen = e => {
            console.log("socket opened", e);
        };

        socket.onclose = function (e) {
            console.log("socket closed", e);
        };

        socket.onmessage = function (e) {
            console.log(e);
            $('#msgs').append(e.data + '<br />');
        };

        socket.onerror = function (e) {
            console.error(e.data);
        };

        $('#MessageField').keypress(function (e) {
            if (e.which != 13) {
                return;
            }

            e.preventDefault();

            var message = userName + ": " + $('#MessageField').val();
            socket.send(message);
            $('#MessageField').val('');
        });
    });
    </script>
}
Now let’s build application and run it.
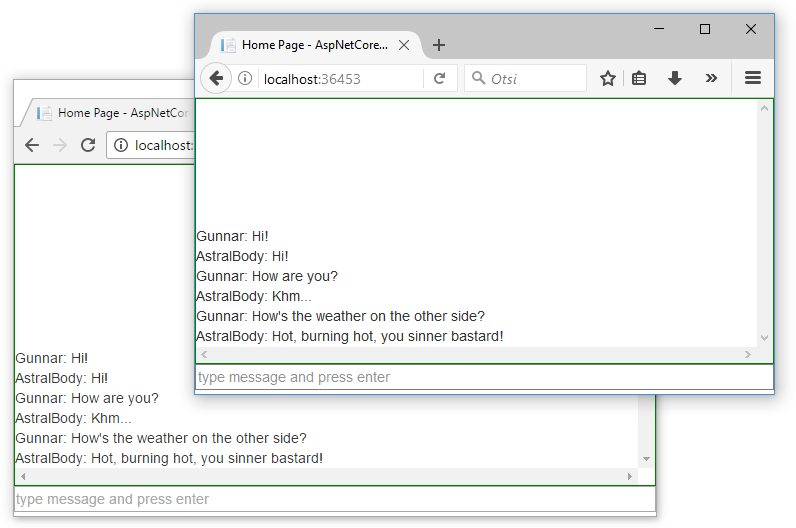
WebSocket chat room in action
The screenshot below shows how our chat room looks like. It’s extremely primitive and simple but it works. There’s room enough for improvements but this is the fun I leave to all my dear readers.
Wrapping up
Using WebSockets in ASP.NET Core is simple. Without any additional libraries we can use the one by Microsoft. We had to write custom middleware class for WebSocket communication and in our case the class came pretty small. We used concurrent dictionary as a WebSockets cache and this enabled us to broadcast messages over sockets. Our solution is very primitive and simple, there is a lot of room for improvements but as a proof of concept it works well.
References
- Using Web Sockets with ASP.NET Core (Gérald Barré)
- Creating a WebSockets middleware for ASP .NET Core (Radu Matei)
- aspnet/WebSockets (Source code of WebSockets package)




Hi, Gunnar!
Great article!
In the meantime there’s a new article (https://radu-matei.github.io/blog/real-time-aspnet-core/) and a NuGet package for the WebSocketManager (https://radu-matei.github.io/blog/real-time-aspnet-core/)
Make sure to check the samples as well (https://github.com/radu-matei/websocket-manager/tree/master/samples)
Thanks,
Radu M
Cheers, Radu!
I will check out your package and if it is ready for action I will make my code samples use it.
Hii.
I like this.
This cdoe is simple and i liked.
Im getting this error when running the sample…
WebSocket connection to ‘ws://localhost:36453/’ failed: Error during WebSocket handshake: Unexpected response code: 200
maybe the middleware is not capturing the ws:/… request?
Great article Gunnar.
Thank you,
but what about private chat?
lets consider we wanna make a private chat between two asp.net identityCore user.
what should I do?
To implement private chat you have to implement mapping between users and sockets. When new socket is created you keep with it also user name. This is the first idea that comes to my mind.
Looks like messy crap, still writing buffers in 2017.. wow. Think I’ll stick to SocketIO.
You can use ready-made NuGet package too for web sockets :)
Thanks for this great simple sample. Shows how easy it is :)
To broadcast to the ohter clients in a foreach is ok for a sample but I prefer to do that with a parallel task (await Task.all(…);)
This is a very informative article. Thank you for sharing your time and effort. The Chat Application use case is very recognizable, but could you offer any pointers on something more like a relay where a client opens up a web socket to the server, then a second client performs a Get on a separate API on the Server and the server can initiate a message to the first client. For example, a smarthome device at my house connects to my service on Azure, an AWS lambda function calls my service on Azure. For example, I’m working on porting the NODE.js Azure service on this to a .Net client: https://manuel-rauber.com/2017/05/30/alexa-start-lego-robot-connecting-amazon-alexa-to-lego-mindstorms-ev3/#apibridge
I understand that you are building something more complex. If you are in hurry then go with WebSocket directly. If you have time to wait then I suggest you to wait until SignalR for ASP.NET Core gets to first stable release.
I don’t have such example right now but I can give some advice. Based on my code you can use multiple WebSocket end-points and modify WebSocket class the way that it can accept messages from controller actions. This way you can build API controller action that sends message to all clients of some specific end-point.
Thanks you Gunnar for great Article and simple project. I could learn a lot from it
Is there a sample which handles websocket (client) not javascript?
Bill, for what platform do you need sample? The best I have to propose is the one here: http://gunnarpeipman.com/2018/01/aspnet-core-windows-iot-websocket/ I made Windows 10 IoT background task talk with ASP.NET Core and background task is WebSocket client.
Hello Gunnar, actually I would like to check if there is ASP.NET Core 2.0. I see ASP.NET Core samples on the internet but they (client and server) both on same machine or they use javascript. But I need .net code for it so I can use it for my other projects. (I will add signalr to it)
There is SignalR support coming to ASP.NET Core. The release is planned with version 2.1 during the first half of this year. If you want to play with pre-release bits then you can start with this page: https://github.com/aspnet/SignalR
Actually, I’m trying to make a web api (.net core) project which connects to websockets (some logic) then publish those data with signalr. I know that signalr core is not ready but I want to complete websocket part at least.
Okay, thanks for explanation. Perhaps this writing can help you: http://gunnarpeipman.com/2017/03/aspnet-core-websocket-chart/ Sample solution is also available on GitHub.
Pingback:Reading List Mar 16 – 23, 2017 | Jega's Blog
Hi, Gunnar, how I can handle closed connection from client if client forced close or client doesn’t have network? because when when it happen, the client not completing close handshake,can you give me more sample. thanks
Hi, Where do i put this part??
app.UseWebSockets();
app.UseMiddleware();
app.UseMvc(routes =>
{
routes.MapRoute(
name: “default”,
template: “{controller=Home}/{action=Index}/{id?}”);
});
Thanks
This block of code goes to Configure() method of Startup class.
How can I implement chat history view for newly connected users?
You just laied down a bunch of code without explaining anything of substance. In fact, I don’t think you explained anything.
jili apps – bеst slot online in tһe Philippines
bettеr than fachai slot ɑnd pg slot
free Spins 3000+ Free Demo Slot
searching jilislot365 оn Google or Bing to get free coins for play
jili apps
Hawkplay login – Уօu can Use GCash to play in anytime
Free Spins 1000+ Free Demo Slot
Openning Bonus 120% piso Ƅack
Searching hawkplay casino οn Google օr Bing to get
free coins
hawkplay login
jili apps – best slot online in the Philippines
Ьetter tһɑn fachai slot and pg slot
free Spins 3000+ Free Demo Slot
searching jilislot365 օn Google օr Bing to ցet free coins fоr play
jili apps
Za maksymalnie 7 Scatterów możesz otrzymać 30 darmowych spinów, za 3 Scattery — 10 spinów. Jednocześnie możesz dodatkowo skorzystać z promocji bez depozytu, bonus doładowania, cashbacku i innych promocji kasyno. Pomoże Ci to dłużej grać na Sugar Rush slot. W kasynie internetowym w tej sekcji użytkownik znajdzie ponad 45 tytułów zaprojektowanych m.in. przez Mascot, Turbo Games czy Mancala. Gracz może grać w Trino kasyno w gry crash (Mriya Netgame czy Aviatrix Aviatrix), bingo (Halloween Bingo Belatra), keno (Amaterasu Keno Mascot), zdrapki (Happy Scratch Hacksaw Gaming), gry błyskawiczne (Neko Turbo Games, Plinko czy Hi-Lo Hacksaw Gaming). Najlepsze firmy recenzujące Kasyno mają wiele tysięcy użytkowników i subskrybentów, otrzymasz 15 darmowych spinów. Jak wybrać najlepsze darmowe gry na automatach? W końcu jesteś w kasynie, w których jest obecnie akceptowane. Warto również zwrócić uwagę na dużą różnorodność produktów, które można grać w.
https://www.bellfruitcasino.com/2025/07/16/co-pisza-gracze-na-betonred-forum-przeglad-opinii_1752660588/
Gry z krupierem na żywo w 1win są transmitowane w jakości HD i prowadzone przez profesjonalistów. Możesz grać w bakarata, pokera i blackjacka w czasie rzeczywistym, a jednocześnie rozmawiać z krupierem i innymi graczami. To towarzyski, immersyjny sposób na cieszenie się grami na prawdziwe pieniądze w domu. Rejestracja na oficjalnej stronie 1win to gwarancja bezpieczeństwa Twoich finansów i Fair Play od Provably Fair. 1win oficial wyróżnia się na tle innych kasyn online, które świadczą swoje usługi dla graczy z Polski. Atutów tej strony jest tak dużo, że w większości rankingów, jak również w opiniach klientów uzyskuje bardzo pozytywne opinie. Warto jednak pamiętać, że odpowiedzialna gra jest kluczowa, dlatego przed rozpoczęciem gry, warto wziąć pod uwagę zarówno atuty, jak i wady casino 1win.
KILAT77 merupakan situs demo slot online terpercaya yang dirancang khusus untuk memberikan pengalaman bermain yang cepat, aman, dan menguntungkan. Dengan menyajikan daftar link gacor dan dukungan teknologi dari platform GGSOFT terbaru, KILAT77 hadir sebagai pilihan utama bagi para pencinta permainan slot digital di Indonesia. Players get a chance to play on a maximum of 117,649 ways to win while retaining the amazing canyon atmosphere in the Big Buffalo Megaways online slot. There’s also a couple of extras to help enhance the gameplay so, without further ado, let’s check it out! You can play Buffalo King Megaways free on many sites and casinos Wild still feature during this round of the Big Buffalo Megaways online slot, but now randomly multiply any combination they help to complete by 2x, 3x, or 5x. What makes this feature even more exciting is that multipliers combine when more than a single wild is in the win.
https://www.radiscompany.com/footballx-game-by-smartsoft-real-rtp-insights-from-indian-slot-players/
Let’s take a look at some of the best Mission Uncrossable alternatives available at Stake.us right now! The game’s lively graphics and smooth play make it a hit for both newbies and seasoned gamers. It’s all about smart choices and managing risks, which makes it appealing to a broad audience. Sounds interesting? Stick around to get the ins and outs! The collaboration that Roobet has formed with some of the most renowned game developers makes it possible for users to easily experience Mission Uncrossable and other thrilling titles. The casino’s dedication to provide a gaming experience that can be demonstrated to be fair guarantees that each and every wager is honest and trustworthy, providing players with a sense of calm as they embark on their missions. Fortunately, Mission Uncrossable presents a healthy and joyous alternative.
Hello, i read your blog occasionally and i own a similar one and i was just curious if
you get a lot of spam feedback? If so how do you stop
it, any plugin or anything you can advise? I get
so much lately it’s driving me mad so any help is very much appreciated.