Our Jekyll blog is published to Azure static website automatically using Jekyll build and release pipelines. We can access site through Azure storage URL. To go live we want to use custom domain and we need Azure CDN for this. Here is how to do it.
- Getting started with Jekyll blog hosted on Azure static website
- Setting up Azure storage static website for Jekyll
- Azure DevOps build pipeline for Jekyll
- Azure DevOps release pipeline for Jekyll
- Taking Jekyll static blog live with Azure CDN and custom domain
Live demo and source are available! Live demo of Jekyll static blog is here: https://jekyll.gunnarpeipman.com. Source code with sample content is available at my Github repository gpeipman/JekyllBlog.
Going live with custom domain
When going live we have to go with HTTPS site. Google considers regular HTTP as unsafe and it may hurt your SEO rankings. First in 2014 Google confirmed HTTPS as SEO ranking factor. I’m sure you don’t want to go live with blob storage or CDN URL-s:
- Blob storage: myurl.z6.core.windows.net
- CDN end-point: myurl.azureedge.net
Actually azureedge.net subdomain seems kind of cool for Azure related blog to me.
The only way to have custom domain for Azure static website is to use Azure CDN service as CDN allows introducing custom certificate.
What is CDN? CDN stands for Content Delivery Network. It means that there are multiple distributed servers all over the world to serve content of different sites. When user comes to page then CDN related resources (images, scripts, styles and for us also HTML-files) are served from nearest server. It makes pages open faster globally and also puts some load off from web servers.
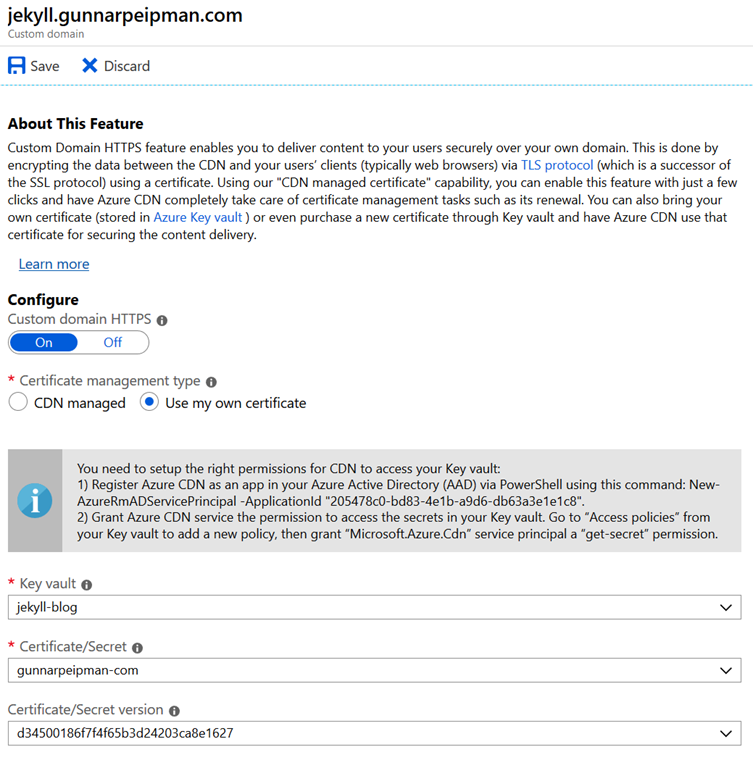
Setting up Azure Key Vault
Azure Key Vault is service for storing keys, secrets and certificates securely so applications doesn’t keep these magical things on hard disc of server. When setting up CDN we need Azure Key Vault as it is the fastest way to get HTTPS work.
Go to Azure Portal and create new key vault. Make sure set same region as your static web site has.
As it takes few minutes to get key vault up and running we can take the next step and add Azure CDN service to Azure Active Directory of Azure subscription.
Run PowerShell as admin and type in the following commands.
Connect-AzureRmAccount -Subscription ""
New-AzureRmADServicePrincipal -ApplicationId "205478c0-bd83-4e1b-a9d6-db63a3e1e1c8"
We need Azure CDN application there as otherwise CDN has no access to key vault.
When key vault is ready upload your SSL certificate to key vault. Select Import as method of certificate creation.
I have wild-card certificate that works with my main domain and all first level subdomains.
Move to “Access Policies” page of key vault and add new policy.
Principal for new policy is Microsoft.Azure.Cdn. For permissions I selected only Get from all permissions dropdowns. Don’t forget to save access policies after clicking Add button.
Setting up CDN
Create new Azure CDN service. Fill all the fields. You don’t have to worry about CDN profile location. It’s global and not bound to any specific region.
For origin hostname select host name of your static website (it is under storage account settings on static website page).
NB! Before going to next step add DNS mapping to your domain. You need CNAME record from myblog.com or blog.mydot.com to myblog.azureedge.net.
NB! As of writing this post Akamai CDN doesn’t support wild card purge, go with Microsoft or Verizon instead.
When CDN service is ready open it and move to Custom Domain page to introduce your domain.
After configuring custom domain successfully sit back and relax. It takes up to few hours to propagate certificate to service.
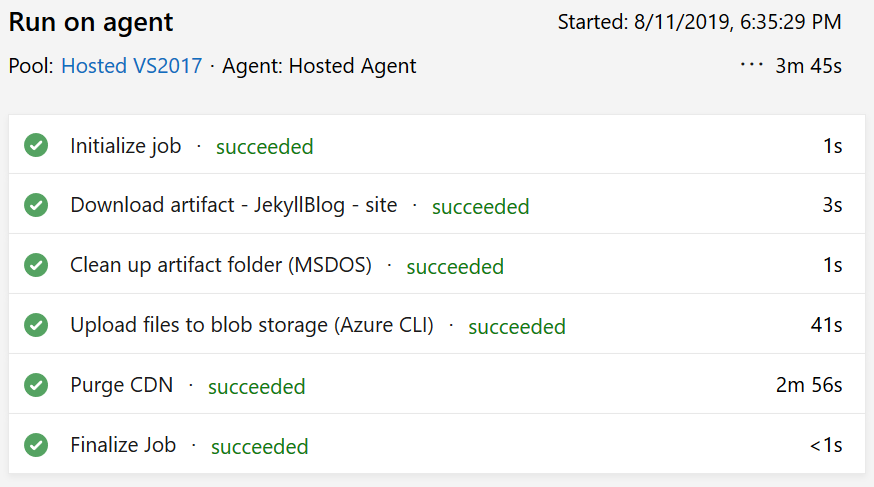
Purge CDN content after release
With CDN we need update to Jekyll release pipeline. When new content is published we want it to be available as fast as possible. This is why we purge CDN content after publishing.
For purge we add new Azure CLI task to release pipeline with following command.
az cdn endpoint purge --resource-group --name --profile-name --content-paths "/*"
Purge task doesn’t need working directory as it makes just one request to Azure services. If everything went well then we should see release status like this.
Now we are ready to test how our static Jekyll blog works in live and if everything is okay then it’s time to start with promoting.
Wrapping up
For beginning bloggers the work is done now and it’s time to start writing interesting content that visitors love and share. Of course, there are more things to do with our Jekyll site but now we are live and there’s no way back. We can create content wherever we are, our content is published through Git and Azure DevOps as pure static web site. Our blog has excellent performance and the number of attack vectors is minimal.