Comparing and updating database schemas using Visual Studio 2010
During development it is possible that database schema changes and usually it changes are same sure to come as tax office and death. Later we need to reflect these changes also to live databases and it is not very easy task to do manually. In this posting I will show you how Visual Studio 2010 database tools can help you to update database schema.
Visual Studio database projects
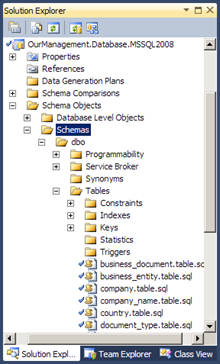
Some people don’t like the idea about database projects and their extreme granularity but I like it. Steps to build database this way are not quickest one but also not too painful. I have time to think about my database schema and all important aspects get my full attention.
One good thing about database projects is that they also support versioning. It is easy to rollback changes I don’t want to keep. When other developers change database schema then I will get these changes when I update my codebase to last version from source code repository.
Now let’s see how I get some changes to other database after I am finished my current tasks and my code works like expected.
Adding schema comparison
One of the folders in your database project is titled as Schema Comparisons. Right-click on this folder and select Add => Schema Comparison. You are asked now for source and target schemas. Database connection you are using in your database project is automatically selected as source schema. Target schema must be given now.
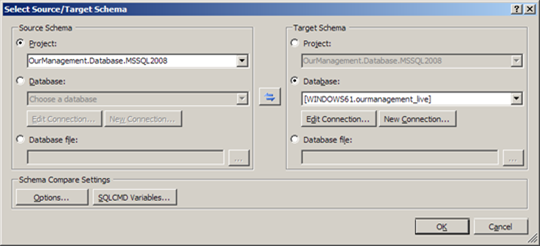
NB! Make sure you have sysadmin permissions for target schema – otherwise you may have troubles generating update script.
As a next thing you have to set some options. I made sure in options that some database level objects are not compared. I really need to upgrade only database objects that are related to data (tables, views, stored procedures, indexes etc).
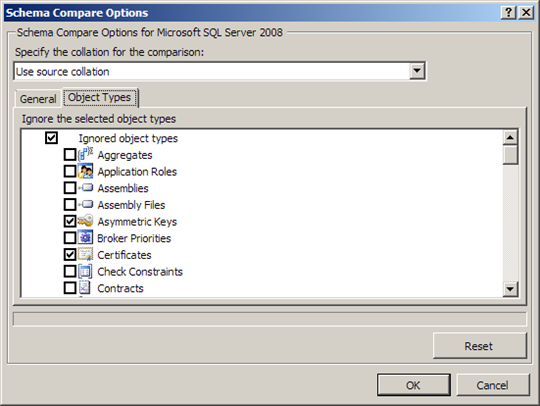
Now you are done with your settings and it is time to compare schemas. Click OK in this window.
Comparing schemas
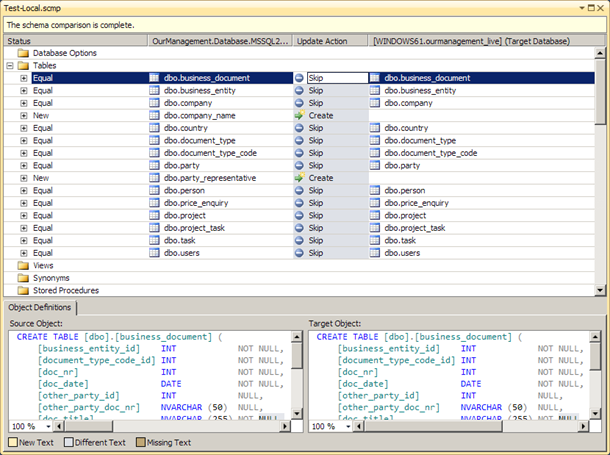
To start comparing schemas click OK button in source and target schemas window. Visual Studio starts with comparing right away. You can see my example results here.
You can see that for some tables there is update action Skip – these tables have no changes. Some tables must be created during to target database. If there are tables that are changed then for these tables there will be action called Update. When we step in this table we can see diffs in Object Definitions tab.
NB! In this point I suggest you to save schema comparison. Otherwise comparison settings are not saved and you have to start from zero next time you run comparison.
Updating target schema
Now as you know changes that need to be done to target schema it is time to decide how we do these changes. We can let Visual Studio to do it but we can also export update script to new editor window or to some file.

I am lazy guy and I will hit Write Updates button. After giving my confirmation Visual Studio makes changes to my target schema and notifies me when changes are done.
Is it always so nice? Not really. This was here just a quick start, a beginning of highway to hell. There are situations when schema updates are not easy and updates may even be conflicting. By example, if you add non-null columns to database tables that contain data and these columns have no default value specified then the update cannot be done automatically.
Conclusion
As we saw then comparing database schemas and updating target schema using Visual Studio 2010 database tools was easy and straight-forward process. We were able to say what objects we want to left out from comparison and we were able to get very good overview about changes that we need to make to target schema. Also it was easy to update target schema.




One thing that shocked me when I first used this Schema comparison tool is that if you rename a table column and you write your changes to a database, the schema compare tool will Delete the old column and create a new one. Deleting the column will delete all data with it. I made this mistake when I propagated a column rename change to production and I lost valuable data. You should use this tool with extreme care.
The Add => Schema Comparison option is only available in Visual Studio Ultimate and Visual Studio Premium:
http://msdn.microsoft.com/en-us/library/dd193250.aspx
Does anyone have a workaround for the column re-naming issue of delete and recreate as mentioned by Johnny to posts ago?