Running .NET Core apps on Windows Sandbox
After my first introduction to Windows Sandbox I took one of my ASP.NET Core applications and tried to find a way how to get it quickly to Windows Sandbox and open in browser. This scenario is already possible and it wasn’t hard all to make things work. This blog post shows how to do it.
Deploying applications to Windows Sandbox
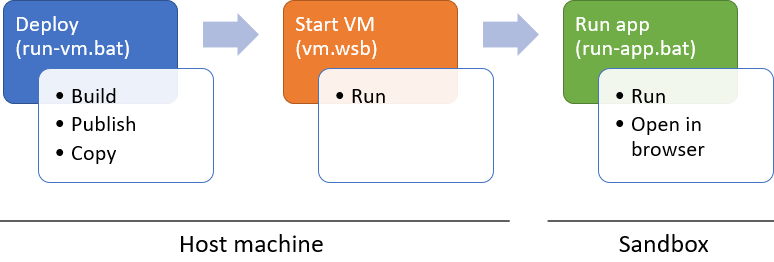
To automate everything possible we have to write deployment scripts and Windows Sandbox configuration file. Diagram here gives better idea how things work.

This blog post uses following files and folders:
- c:\sandbox\app1\ – root folder for application on host machine
- c:\sandbox\app1\publish\ – published application binaries on host machine
- c:\sandbox\app1\run-vm.bat – script to publish application and run Windows Sandbox
- c:\sandbox\app1\vm.wsb – Windows Sandbox configuration file for application
- c:\sandbox\app1\run-app.bat – logon script for running application in Windows Sandbox
In this point it’s good idea to create these files and folders because the main action is about to start.
It’s possible to apply same pattern for other types of applications too.
Running self-contained applications
The easiest scenario is using self-contained .NET Core application as it has not much expectations for environment where it runs. On host machine we have to deploy our application to shared folder. Then we run Windows Sandbox and logon script will run our application.

To publish application as a self-contained one we have to specify target environments in project file. Here we need to support only Windows and here is runtime identifiers block from my demo application.
<PropertyGroup>
  <TargetFramework>netcoreapp2.2</TargetFramework>
  <!-- Other project level settings -->
  <RuntimeIdentifiers>win-x64</RuntimeIdentifiers>
</PropertyGroup>
Now we can write script that publishes our application Here is my host machine script called run-vm.bat.
del c:\sandbox\app1\publish\*.* /Q
cd c:\projects\my-application
dotnet publish -c release -r win-x64 -o c:\sandbox\app1\publish
cd c:\sandbox\app1\
vm.wsb
It deletes all files from publishing folder and publishes application with release configuration for 64bit Windows. Published files are written to application folder we prepared before. After this script runs Windows Sandbox by calling vm.wsb file.
WSB-files are Windows Sandbox configuration files. There not much configuration options right now. Here is my WSB-file.
<Configuration>
  <VGpu>Disable</VGpu>
  <MappedFolders>
    <MappedFolder>
      <HostFolder>c:\sandbox\app1\</HostFolder>
    </MappedFolder>
  </MappedFolders>
  <LogonCommand>
    <Command>C:\Users\WDAGUtilityAccount\Desktop\publish\run-app.bat</Command>
  </LogonCommand>
</Configuration>
MappedFolder section tell Windows what folder to share with Windows Sandbox. On sandbox all shared folders appear currently on desktop of WDAGUtilityAccount user account. LogonCommand specifies script in shared folder we want to run when Windows Sandbox is booted.
Logon script (run-app.bat in my case) is here.
cd C:\Users\WDAGUtilityAccount\Desktop\public\app\
start /b cmd /c C:\Users\WDAGUtilityAccount\Desktop\dl\app\my-application.exe
TIMEOUT /T 10
start http://localhost:5000
It starts deployed application in separate process, waits for 10 seconds and then opens application in browser. For regular console applications it’s enough if we move to application folder and run application executable.

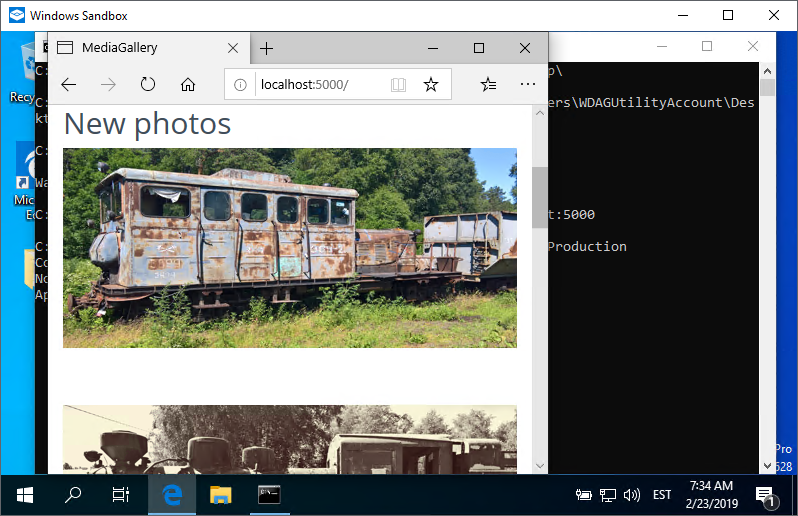
After writing scripts and configuring Windows Sandbox all I had to do to get to this nice screen was to click on run-vm.bat, sit back and enjoy the show.
Wrapping up
Although Windows Sandbox is not officially releaset yet it is complete enough to start playing with it to find out how it works and how it supports our work scenarios. There are not many configuration options available yet but what it has is enough for us to get started. This bloh post was good example about how we can write simple scripts to get our .NET Core appliations run on Windows Sandbox within minutes.


Comments are closed.