ASP.NET: Building tree picker dialog using jQuery UI and TreeView control
Selecting things from dialogs and data represented as trees are very common things we see in business applications. In this posting I will show you how to use ASP.NET TreeView control and jQuery UI dialog component to build picker dialog that hosts tree data.
Building dialog box
As I don’t like to invent wheels then I will use jQuery UI to solve the question related to dialogs. If you are not sure how to include jQuery UI to your page then take a look at source code – GitHub also allows you to browse files without downloading them.
I add some jQuery based JavaScript to my page head to get dialog and button work.
<script type="text/javascript">
    $(function () {
        $("#dialog-form").dialog({
            autoOpen: false,
            modal: true
        });

        $("#pick-node")
            .button()
            .click(function () {
                $("#dialog-form").dialog("open");
                return false;
            });
    });
</script>
Here is the mark-up of our form’s main content area.
<div id="dialog-form" title="Select node">
<asp:TreeView ID="TreeView1" runat="server" ShowLines="True"
ClientIDMode="Static" HoverNodeStyle-CssClass="SelectedNode">
<Nodes>
<asp:TreeNode Text="Root" Value="Root">
<asp:TreeNode Text="Child1" Value="Child1">
<asp:TreeNode Text="Child1.1" Value="Child1.1" />
<asp:TreeNode Text="Child1.2" Value="Child1.2" />
</asp:TreeNode>
<asp:TreeNode Text="Child2" Value="Child2">
<asp:TreeNode Text="Child2.1" Value="Child2.1" />
<asp:TreeNode Text="Child2.2" Value="Child2.2" />
</asp:TreeNode>
</asp:TreeNode>
</Nodes>
</asp:TreeView>
</div>
<button id="pick-node">Pick user</button>
Notice that our mark-up is very compact for what we will achieve. If you are going to use it in some real-world application then this mark-up gets even shorter – I am sure that in most cases the data you display in TreeView comes from database or some domain specific data source.
Hacking TreeView
TreeView needs some little hacking to make it work as client-side component. Be warned that if you need more than I show you here you need to write a lot of JavaScript code. For more advanced scenarios I suggest you to use some jQuery based tree component. This example works for you if you need something done quickly.
Number one problem is getting over the postbacks because in our scenario postbacks only screw up things. Also we need to find a way how to let our client-side code to know that something was selected from TreeView.
We solve these to problems at same time: let’s move to JavaScript links. We have to make sure that when user clicks the node then information is sent to some JavaScript function. Also we have to make sure that this function returns something that is not processed by browser. My function is here.
<script type="text/javascript">
    function selectNode(value, text) {
        $("#dialog-form").dialog("close");
        alert("You selected: " + value + " - " + text);
        return undefined;
    }
</script>
Notice that this function returns undefined. You get the better idea why I did so if you look at server-side code that corrects NavigateUrl properties of TreeView nodes.
protected override void OnPreRender(EventArgs e)
{
    base.OnPreRender(e);

    if (IsPostBack)
        return;

    SetSelectNodeUrls(TreeView1.Nodes);
}

private void SetSelectNodeUrls(TreeNodeCollection nodes)
{
    foreach (TreeNode node in nodes)
    {
        node.NavigateUrl = "javascript:selectNode('" + node.Value +
                            "','" + node.Text + "');";
        SetSelectNodeUrls(node.ChildNodes);
    }
}
Now we have TreeView that renders nodes the way that postback doesn’t happen anymore. Instead of postback our callback function is used and provided with selected values. In this function we are free to use node text and value as we like.
Result
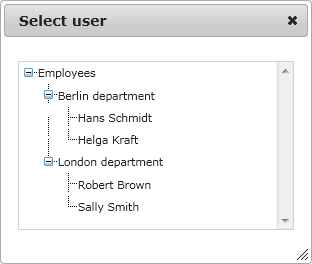
I applied some more bells and whistles and sample data to source code to make my sample more informative. So, here is my final dialog box.

Seems very basic but it is not hard to make it look more professional using style sheets.
Conclusion
jQuery components and ASP.NET controls have both their strong sides and weaknesses. In this posting I showed you how you can quickly produce good results when combining jQuery and ASP.NET controls without pushing to the limits. We used simple hack to get over the postback issue of TreeView control and we made it work as client-side component that is initialized in server. You can find many other good combinations that make your UI more user-friendly and easier to use.


Nice post but it creates more problems than it solves, server state for these kinds of controls can quickly become unwieldy.
Client side is tricky but far more rewarding and performant.
Hi,
Thank you for this cool feature.
I was wondering if it works with Firefox or safari.
thanks
I think you’re missing “(value, text) {” (without quotes) when declaring your javascript function
Thanks for feedback, guys!
Alan, this post does not create problems as I said it is solution only for simpler cases. In simples client-side cases you don’t need server-side events. You just let user select the node and that’s it.