Microsoft Azure Cognitive Services offer us computer vision services to describe images and to detect printed or handwritten text. Text recognition provides interesting scenarios like cloud based OCR or providing automated translations for texts on images. This blog post focuses on recognizing printed text using Azure Computer Vision API.
Source alert! Sample solution built on ASP.NET MVC 5 with full source code for this blog post is available at my public GitHub repository CognitiveServicesDemo.
Getting started
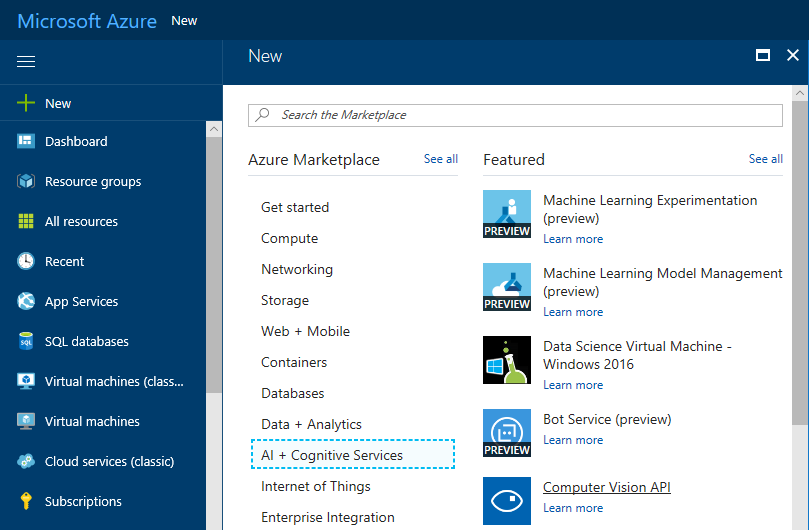
To get started Microsoft Azure account is needed. Go to Azure Portal and log in or register for new account. After this add new Computer Vision subscription like shown on the following image.
After filling in service parameters Computer Vision service is added to Azure subscription. To just play with computer vision services the simples account S0 is enough.
Getting connected
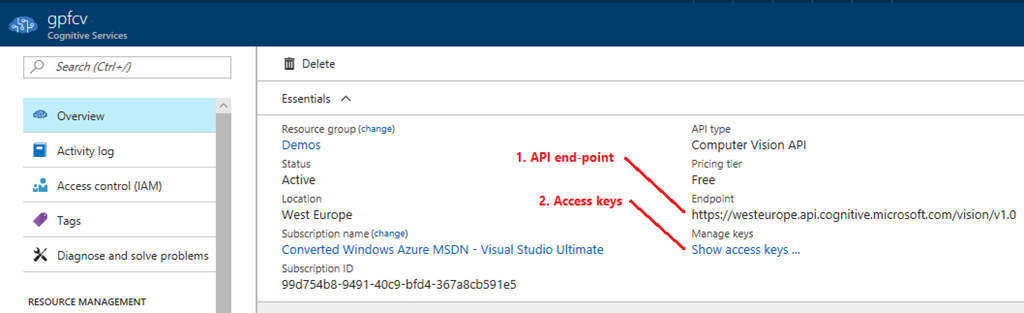
To use computer vision API we need API end-point and access keys. These parameters are available on computer vision service Overview blade in Azure Portal.
In my solution I keep service end-point URL and access key in web.config file. In computer vision base controller I initialize computer vision services client using the following piece of code.
public abstract class ComputerVisionBaseController : ImageUsingBaseController
{
    protected VisionServiceClient VisionServiceClient { get; private set; }

    public ComputerVisionBaseController()
    {
        var apiKey = ConfigurationManager.AppSettings["CognitiveServicesVisionApiKey"];
        var apiRoot = ConfigurationManager.AppSettings["CognitiveServicesVisionApiUrl"];
        VisionServiceClient = new VisionServiceClient(apiKey, apiRoot);
    }

    // ...
}
This way I make VisionServiceClient available for all controllers that need it. VisionServiceClient comes with NuGet package Microsoft.ProjectOxford.Vision.
NB! My sample solution is more complex than shown in this blog post. I present here some important pieces you can pile up to your sample solution if all you want is simple proof-of-concept style application that uses computer vision services.
Reading text from images
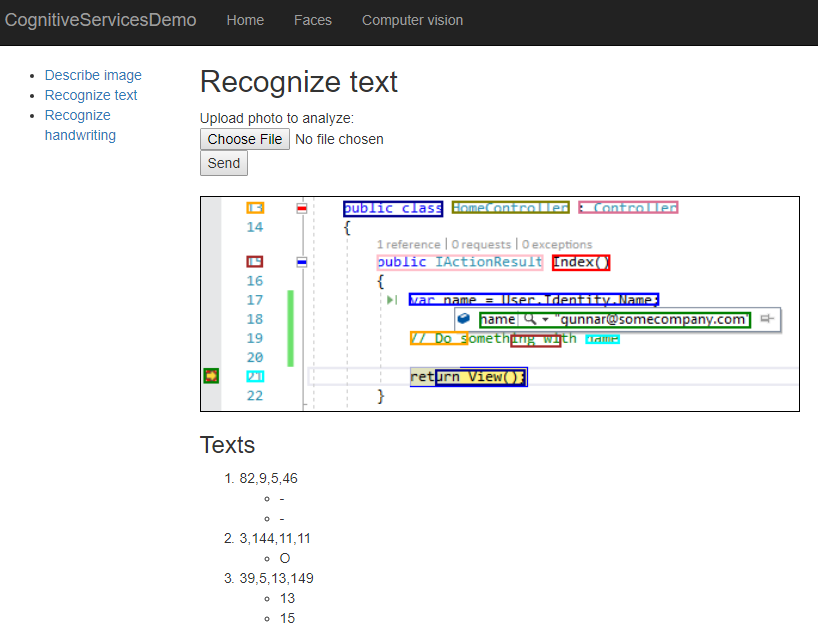
To read text from images we need controller. I show here how to build simple controller action that returns view where user can upload image to analyze. If image is given then the same view is used to show information about it. The point is to analyze uploaded image, draw rectangles around detected text and print out the list of lines found on image like shown on image below.
Here is my controller action to detect text from printed image. If it is GET request then it returns view with upload form. For POST request processed image with detected texts is returned. I describe RunOperationOnImage trick in next point.
public async Task<ActionResult> Index()
{
    if (Request.HttpMethod == "GET")
    {
        return View();
    }

    var model = new RecognizeTextModel();

    await RunOperationOnImage(async stream =>
    {
        model.Results = await VisionServiceClient.RecognizeTextAsync(stream, detectOrientation: false);
    });

    model.ImageDump = GetInlineImageWithLines(model.Results);

    return View(model);
}
To get data from controller to view the following simple model class is used. To avoid saving images temporarily to some storage the inline images are used. It’s not very effective but at least there’s no dependencies to storage and demo solution is therefore easier to set up and run.
public class RecognizeTextModel
{
    public OcrResults Results;
    public string ImageDump;
}
Here is the view for Index action.
@model RecognizeTextModel
@{
    ViewBag.Title = "Recognize text";
}

<h2>Recognize text</h2>

@Html.Partial("_Upload")

@if (Model != null && !string.IsNullOrEmpty(Model.ImageDump))
{
    <img src="@Model.ImageDump" width="600" />

    <h3>Texts</h3>

    <ol>
    @foreach(var result in Model.Results.Regions)
    {
        <li>
            @result.BoundingBox
            <ul>
                @foreach(var line in result.Lines)
                {
                    <li>
                        @foreach(var word in line.Words)
                        {
                            <text>@word.Text</text>
                        }
                    </li>
                }
            </ul>
        </li>
    }
    </ol>
}
Here is the partial upload view that is used all over my sample solution.
@{
    Layout = null;
}
<form method="post" enctype="multipart/form-data">
    Upload photo to analyze: <br />
    <input type="file" name="ImageToAnalyze" /><button type="submit">Send</button>
</form>
Now we have all basic things done and it’s time to get serious and make hands really dirty.
Handling images
I wrote some defensive code that takes care of some small tasks:
- Make sure image is not too big by dimensions
- Resize image if needed
- Keep clean copy during request
- Provide method for operations on clean copy
Clean copy issue is perhaps most cumbersome. The idea is simple – when image is uploaded make sure it is not too big for Cognitive Services to handle and keep copy of image for operations that may dispose the image stream. Some of Cognitive Services API methods automatically dispose streams they operate on and this is why it’s good idea to have a clean copy of image available.
public abstract class ImageUsingBaseController : Controller
{
    protected Stream ImageToProcess = new MemoryStream();

    protected void ResizeImage(Stream fromStream, Stream toStream)
    {
        var image = Image.FromStream(fromStream);

        if (image.Width <= 1200)
        {
            fromStream.Seek(0, SeekOrigin.Begin);
            fromStream.CopyTo(toStream);
            image.Dispose();
            return;
        }
        var scaleFactor = 1200 / (double)image.Width;
        var newWidth = 1200;
        var newHeight = (int)(image.Height * scaleFactor);
        var thumbnailBitmap = new Bitmap(newWidth, newHeight);

        var thumbnailGraph = Graphics.FromImage(thumbnailBitmap);
        thumbnailGraph.CompositingQuality = CompositingQuality.HighQuality;
        thumbnailGraph.SmoothingMode = SmoothingMode.HighQuality;
        thumbnailGraph.InterpolationMode = InterpolationMode.HighQualityBicubic;

        var imageRectangle = new Rectangle(0, 0, newWidth, newHeight);
        thumbnailGraph.DrawImage(image, imageRectangle);

        thumbnailBitmap.Save(toStream, image.RawFormat);

        thumbnailGraph.Dispose();
        thumbnailBitmap.Dispose();
        image.Dispose();

        toStream.Seek(0, SeekOrigin.Begin);
    }

    protected async Task RunOperationOnImage(Func<Stream, Task> func)
    {
        ImageToProcess.Seek(0, SeekOrigin.Begin);

        using (var temporaryStream = new MemoryStream())
        {
            ImageToProcess.CopyTo(temporaryStream);
            temporaryStream.Seek(0, SeekOrigin.Begin);
            await func(temporaryStream);
        }
    }

    protected override void OnActionExecuting(ActionExecutingContext filterContext)
    {
        base.OnActionExecuting(filterContext);

        if (Request.Files.Count > 0)
        {
            ResizeImage(Request.Files[0].InputStream, ImageToProcess);
        }
    }

    protected override void Dispose(bool disposing)
    {
        base.Dispose(disposing);

        if (ImageToProcess != null)
        {
            ImageToProcess.Dispose();
            ImageToProcess = null;
        }
    }
}
With this code done it’s time to draw rectangles around text lines found on image.
Drawing rectangles on image
To show rectangles around detected texts we use simple method on copy of original image. The method below takes detected results and based on their rectangles draws lines around texts on original image.
protected string GetInlineImageWithLines(OcrResults result)
{
    ImageToProcess.Seek(0, SeekOrigin.Begin);

    using (var img = new Bitmap(ImageToProcess))
    // make copy, drawing on indexed pixel format image is not supported
    using (var nonIndexedImg = new Bitmap(img.Width, img.Height))
    using (var g = Graphics.FromImage(nonIndexedImg))
    using (var mem = new MemoryStream())
    {
        g.DrawImage(img, 0, 0, img.Width, img.Height);

        var i = 0;

        foreach (var region in result.Regions)
        foreach (var line in region.Lines)
        {
            var pen = new Pen(Settings.ImageSquareColors[i], 2);
            g.DrawRectangle(pen, new System.Drawing.Rectangle(
                    line.Rectangle.Left,
                    line.Rectangle.Top,
                    line.Rectangle.Width,
                    line.Rectangle.Height
                ));
            i++;
            if(i >= 10)
            {
                i = 0;
            }
        }

        nonIndexedImg.Save(mem, ImageFormat.Png);

        var base64 = Convert.ToBase64String(mem.ToArray());
        return String.Format("data:image/png;base64,{0}", base64);
    }
}
In code below there is class called Settings used. This is simple class where I keep different static settings. One of these settings is colors array.
public static class Settings
{
    public static Color[] ImageSquareColors
    {
        get
        {
            return new[] { Color.Red, Color.Blue, Color.Green, Color.Orange, Color.Brown, Color.Cyan,
                            Color.DarkBlue, Color.Olive, Color.PaleVioletRed, Color.Pink};
        }
    }
}
Now we are ready to try computer vision API out with our own code.
Testing with images
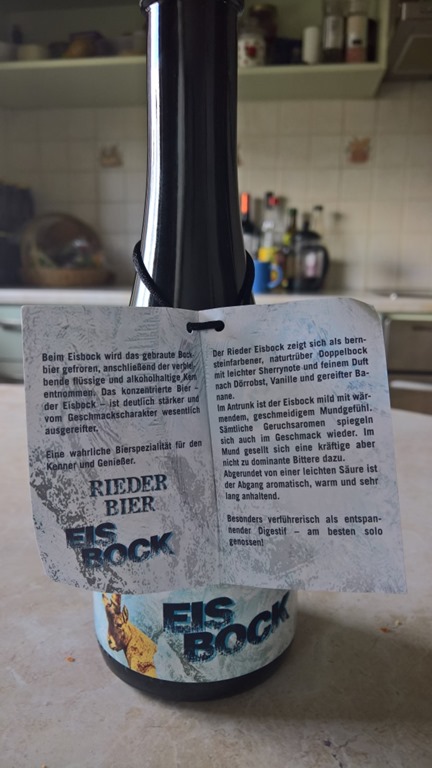
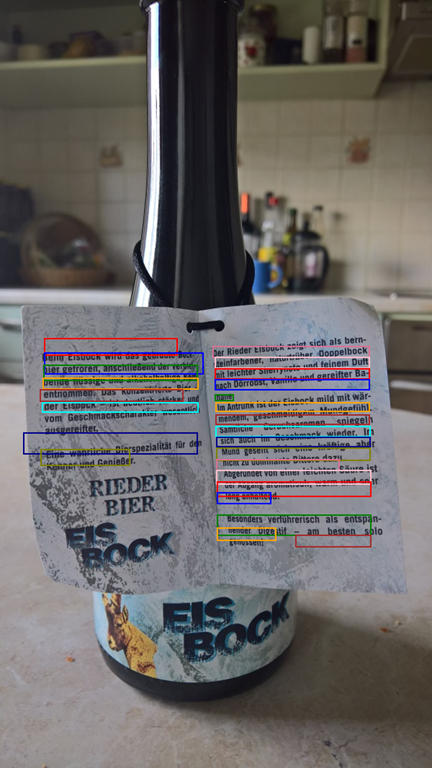
Let’s test computer vision text detection using different images. I show here original image and image with rectangles side by side so it is easier to see what was detected.
As images above demonstrate then there is still room for development. If image is simple and text is very clear then computer vision service makes a good job. As soon as there are at least some anomalies things change. The last image with Rieder Eisbock from Austria is a good example. It’s paper label tied to bottle neck, it has soft background illustration, text is not straight on image and different fonts are used. Take a careful look – only small text is detected but not text blocks with capital letters.
Want to try without coding? Yes, it is possible. Just go to Azure computer vision services page and scroll down a little bit. It is possible to submit URL of image to analyze on this page and see the results that API returns.
Wrapping up
Azure Computer Vision API is intelligent service but it still makes it baby steps. OCR service is already usable for simpler scenarios but if there’s even minor unexpected tricks on images it faces troubles. As these services are part of Microsoft AI family and AI has strategic role in Microsoft then we can expect that these services will get better and better over time. Computer Vision services are already usable today and I think it’s time to build at least some first prototypes of apps that make use of these services.
View Comments (3)
Interesting stuff. I am glad you are taking the time to look into these new technologies. I appreciate your interpreting the information for us.
I learned something new about coding from this article: "// make copy, drawing on indexed pixel format image is not supported". Not knowing that until now, I struggled for hours trying to draw a rectangle on an image.
Thank you,
Frank
I received this error Exception of type 'Microsoft.ProjectOxford.Vision.ClientException' was thrown.
If you get exception then always investigate in on debugger. Often exception give you way more information than just exception type. Based on exception type it's almost impossible to say what's wrong.